Wrinkles, it’s tough to think of a situation where they’re a positive thing.
Wrinkled clothes look sloppy. Wrinkled paper is headed to the trash. Wrinkled skin means loss of vitality. Shar-Pei puppies are the only exception that comes to mind.
But why do wrinkles get such a bad rap?
Take me straight to the instructions.
WRINKLE REALIZATIONS
Wrinkles are simply a result of the natural aging process.
There isn’t a human on this planet, no matter how beautiful or rich or powerful, who can escape them. The only way to completely stop wrinkles is to die. Think about that, wrinkles or death.
There isn’t a human on this planet, no matter how beautiful or rich or powerful, who can escape wrinkles.
Perhaps someday, our Western culture will embrace wrinkles. Maybe we’ll eventually come to realize that wrinkles are badges of honor that represent the success of surviving another day.
But we’re not there yet. And, the truth of it is, there’s power in youthfulness.
Wrinkle MANAGEMENT
There are lots of options when it comes to managing wrinkles: expensive creams, vitamin-based serums, chemical peels, lasers, and, of course, Botox.
Most of us are using a combination of these. Some are safer, some are more effective, and some are a mystery. Fortunately, anti-wrinkle patches are both safe and effective.
Do they work as well as Botox? Of course not. It’s absurd to think that sticking a piece of paper on your face will work as quickly as sticking a paralyzing agent into your muscles. But anti-wrinkle patches also won’t ever make you pee your pants or make you getting a feeding tube. These are real potential side effects listed in Botox’s fine print.
Since I don’t fancy wearing diapers and I do fancy eating solid food, I’ll stick with the face patches.
Patch Parts
There are two main parts to an anti-wrinkle face patch: paper and glue. It doesn’t get more simple than that.
The Paper
For the paper, you can grab whatever you have on hand. Printer paper, envelopes, or junk mail cluttering the kitchen counter will all work. Remember, your skin is an organ and will absorb whatever it touches.
I recommend using natural kraft paper.* It’s food-grade, unbleached, unwaxed, and very affordable. This roll is only $15 versus $20 for a tiny box of Frownies.
The Glue
If you’re health-conscious, you might be hesitant to rub glue all over your face. But this isn’t just any glue we’re talking about.
This is gum arabic. Excuse my dramatics, but I love gum arabic. The vast array of its uses and health benefits boggles my mind.
It’s worth buying quality gum arabic powder* to make the glue for these anti-wrinkle patches. This bag says Acacia Senegal, but that’s just another name for gum arabic. I use this brand because Anthony’s products are always great quality.
Gum arabic glue benefits the skin on multiple levels, and you’ll find tons of other uses for it.
Gum Arabic Basics
You might be wondering, what exactly is gum arabic? Gum Arabic is the hardened sap from a species of tree called Acacia. Similar to pine sap but better. (That’s a brave statement, but read on.)
Cultures all over the world have been using gum arabic for over 4,000 years! It’s been utilized for food preparation, medicine, and cosmetics. It’s reported that Queen Elizabeth I and Cleopatra added it to their ancient beauty routines.
Fast forward to modern times, and humans use it more than ever. Gum arabic is now an FDA-approved substance that’s added to thousands of products. Check out this article to see how many places it can be found.
Would civilization exist without cake frosting and fireworks? I doubt it. Therefore, I don’t feel it’s an exaggeration to say gum arabic is the glue that holds our society together.
And it can help hold our faces together too.
Making The Patches
Here’s how to make your own version of Frownies.
DIY Frownies
Materials:
- 3 tbsp gum arabic powder*
- 1/3 cup water
- natural kraft paper*
Equipment:
- small saucepan*
- fork
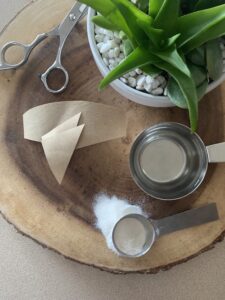
- scissors
Instructions:
- Heat the water at medium-high in a small saucepan.
- Add the gum arabic powder to the warmed water.
- Cook on medium heat for about 15 minutes, stirring frequently, until it forms a glue-like consistency.
- Remove the glue from the stove and transfer it to a sterile storage container.
- Cut the paper into shapes that fit the target areas on your face.
- When ready to use, apply the cooled glue to the paper cutouts with a clean fingertip.
- Store the glue in the fridge and use it within two weeks.
The Glue
When you first mix the gum arabic powder into the water, it’ll look like cottage cheese. Don’t worry, this is normal. Eventually, the water and gum arabic powder will combine to create a smooth glue.
The final result will be golden-colored glue that you can easily pour into your storage container. Please make sure your container is sterile. And only use clean fingers when applying the glue to the paper.
The Paper
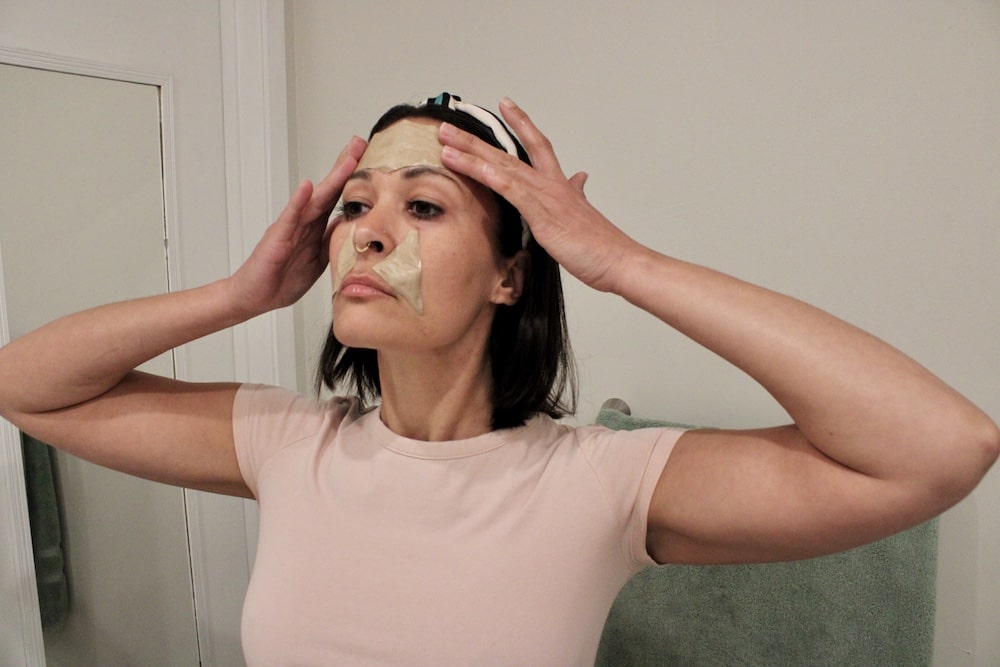
When cutting the paper, you can create shapes for any area you want to smooth. For my forehead wrinkles, I cut an oval piece with indents for my eyebrows.
For my smile lines, I cut a 1×1 inch square piece, then I cut that square in half diagonally to make two equal-sized triangles.
The equipment
In order to keep the glue from burning, you’ll want to use a very small saucepan. I have a dedicated pan just for making glue. A saucepan like this* with a small surface area will keep all the liquid contained so that it doesn’t spread out too much and overcook.
The Cleanup
If the sticky action of this project is making you nervous, don’t stress. Cleanup is easy. Just soak the saucepan and fork in hot water for a few minutes. No scrubbing is required.
TIPS AND TRICKS
Here are a few pointers to get better results with your anti-wrinkle patches.
- Apply the patches to a clean, dry face.
- Make sure to remove all lotions and oils from your skin. If the patches can’t stick, they won’t work.
- Gently massage your forehead before applying the patch.
- Massaging the forehead muscles for a few seconds before application relaxes the muscles and smooths existing wrinkles.
- Puff out your cheeks after applying the patches to the smile lines.
- This chipmunk-cheek effect helps the paper stiffen in a position that minimizes the smile lines most effectively. (No, I won’t call smile lines “nasolabial folds.” That sounds gross.)
- Use warm water to remove the patches.
- Splash warm water on your face to loosen the glue, and then gently peel off the patches. Pulling them off without wetting them first will result in an unintended wax job.
Consistency is key.
These patches are retraining wrinkle grooves created by decades of habitual facial expressions. Those wrinkles didn’t show up in one week, and they won’t be leaving that quickly either.
But with continuous use, you will see excellent results.
Hi!
I’ve read through nearly all the comments but couldn’t find anyone who had a similar experience. I tried applying the glue to the paper in one large batch. Let it dry, then cut out as I need. However the paper curled up and left indentations in my skin at the edges in the morning. Do you think the glue was too thick? Still too warm? Thank you for your help!
Hi!! Same thing happens to me but I think that’s fine. I still use the patches and I do the same process like you where I apply it on the paper let it dry and then cut out shapes however I want I don’t think the glue is to thick as I apply with the brush evenly throughout the paper. I just think it curls up because it’s wet and then once it’s dry, it’s curled up. For me it still works and I use it anyway.
thanks so much for this! I followed other commenter advice and applied the glue to a large sheet of butcher paper. I found the glue was a bit too thick to spread with a brush so instead I used a metal bench scraper which worked beautifully. after drying, I cut them into squares and triangles. they work better than frownies and, perhaps most importantly, don’t have that awful smell!
Anthony’s is currently unavailable.
Do you suggest another brand?
Thanks
Hi, Jacquie! Pure is a pretty great brand. You can find their gum arabic on Amazon here: https://amzn.to/45g4Ror
I use Pure’s version for hyaluronic acid and zinc too, and their products have always done me right.
Hi Rubina, just found your blog after searching how to make my own frownies and I’m delighted to see you have a solution to my quest. Question: Do Frownies or homemade Frownies work on neck lines?
Hey, Erika! I’m so glad you found the article helpful. Making your own version is far more affordable and better for your skin. 🙂
We’re on the same wavelength because I also tried to think of how I could use these on my neck. I personally didn’t find it a good fit since the paper edges were just too rough and it left crinkles on my neck as I moved my head around. Tried it with a neck brace over it, but it still wasn’t great.
I ended up making a homemade neck pad using agar agar powder and a few other skin-benefiting ingredients which I wore under an ace bandage (to keep the pad in place) and a foam neck brace (to keep my head from moving up and down). Not the most comfortable setup but pretty effective. I can write an article detailing that process if you guys are interested!
I rarely comment but thanks for this idea – and for continuing to respond to people all this time! I would be interested in neck care as well. For the forehead, I double the amount, spread it on craft paper, allow it to dry and cut it up to Frownies-like pieces, and just apply water when I want to use them. Works very very well.
Thank you! I never comment on anything- but I have tried this and it really works. I tripled the recipe, allowed the glue to cool and simply spread it on a large piece of recommended paper. Allowed it to dry overnight, cut up to small pieces and placed it in the zip lock bag. When I was ready to use it I simply held several pieced that I wanted to use under running water for several seconds before placing them on my forehead. It formed a firm but comfortable cast, it did not irritate the skin or moved overnight. I have been using Frownies but I find the paper too stiff and not really comfortable. I have started face taping too which seemed to work well for a couple of months but I am starting to feel like it is damaging the skin barrier. Thank you for posting this recipe!
Kristi, you’re so welcome! I feel extra honored that you don’t usually comment but took the time to give your feedback. This is so helpful to everyone who comes to this page. All of you ladies bring such value by sharing your personal experiences with this recipe. 🙂
Gum arabic will definitely NOT damage the skin barrier. In fact, it can help protect it. In my article about gum arabic’s health benefits (https://upkeepist.com/the-unbelievable-health-benefits-of-gum-arabic/), I linked studies that discuss its application in biomimetic hydrogels for wound healing. You know it’s got to be awesome when it’s being used like that.
Hi, just saw your comment – I made this for the first time tonight. Wondering how you spread the glue on the paper? I worked while it was still hot, and it was pretty thick and didn’t spread well. I only was able to cover a 4″ x 10″ piece of paper with a single recipe. Appreciate any tips you may have.
There are so many benefits to this recipe! I paid Frownies hundreds for their great idea and I think that’s enough! I even bought fake ones (didn’t know they were fake ) off eBay and they sucked! Tried silicone wrinkle patches don’t stay on and aren’t really reusable. honestly, can I pay you something?
With Frownies, the origins of the glue is a mystery. Gum Arabic is plant-based and no chemicals!! Also easy to make and they stick really well!
This is a brilliant idea, thank you so much!! Again, if there’s a way I can tip you let me know! Maybe set up a payment account specifically for this purpose?
Just dropping a big thank you to Rubina for the post and for faithfully responding to questions (even previously answered questions) over the past 3 years! xoxo
This comment gave me the biggest smile. Thank you for recognizing the effort put into this post. You’re the best, Amanda!
Hi!
I just wanted to say thank you for this amazing recipe! I’ve been buying Frownies for years, but I live in Spain and here they cost around €40, which is roughly $46. Since I have a small forehead, I use 6 patches to cover it — that’s about 2 boxes a month. Honestly, it ends up being more expensive than Botox in Spain!
I’ve tried so many alternatives — kinesiology tape, medical tape, etc. — but nothing managed to keep my forehead as still as Frownies… until now. Your recipe is magical!
I also wanted to share a little tip of my own: I bought an artist’s notebook made of unbleached, chemical-free 100 g/m2 kraft paper, and a 600g bag of organic gum arabic. I mixed 1 teaspoon of the gum with 1 tablespoon of boiling water in a cup, stirred it with a spoon, let it cool for about a minute. Then I cut a long strip of the kraft paper into irregular pieces with scissors, spread the mixture on with my fingers, and layered them over my forehead.
The result is amazing — it actually works better than Frownies! They don’t have that stinky smell, they mold better to the shape of my forehead because the paper is thinner, and for some reason they itch less (I have super sensitive skin). And the best part — my forehead is frozen!
I still need to see how it performs long-term, but for now I’m thrilled. I spent €25 and, judging by how little I’ve used, I’ll have my own DIY Frownies for almost 8 months! Thanks so much! (Y perdonen mi inglés 😅).
I found this page looking for an alternative because my boyfriend absolutely hates the smell of real Frownies. He calls them “stinky papers.” Does this homemade glue have an odor?
Hey, Sarah! The arabic glue has a very mild, slightly sweet scent so I think it smells good.
Thank you for such an amazing recipe! Frownies are $25/box which seeing the ingredients I find too expensive…
I just need some help with the paper, what kind of paper exactly should we use? frownies seems a thick paper, I feel like butcher paper is too thin?
thank you in advance!
I was wondering about the paper thickness as well..
I just ordered through your link ingredients to make Frownies. question, is Arabic Senegal Powder the same as gum xanthan/Arabic? I hope so cuz I will soon have a pound of it!
Hi Barbara! I really appreciate you supporting my post! Yes, Acacia Senegal is the same thing as gum arabic (though different than xanthan). Xanthan gum is a polysaccharide created by bacteria, and gum arabic is a derived from tree sap. Let me know if you have any other questions.
I have been using this exact technique for several months, and here are some tips I have found useful. Spread the glue on the paper, let dry, then cut. I save like 50 pieces in a baggie. Then at night, I apply a diamond shape to the area vertically, between my eyes and middle forehead, then 4 triangle shapes (2 above eyebrows, and 2 just under hairline at top of forehead, making sure each paper overlaps each other. That’s very important! This creates a very sturdy bond that keeps your forehead from moving. Here’s the GREAT part I discovered.
In the morning…If you can manage to carefully peel off the entire piece “intact”, it is the exact contour of your forehead, you can save it to use the next night. just spritz with water and stick on. The glue may not be as strong, but still gets the job done.
Thank you Maggie for sharing your tips. I love the idea of making 50 ahead of time. Now, when you go to use them, do you moisten them to reactivate the glue?
Wow! It works so well, and it cost me “nothing.” I used the original Frownies before, and my homemade ones are just as good! Thank you so much for sharing! ❤️
I’m so happy you found this post useful. Thanks for your positive feedback! 🙂
Can you just use the glue and not use the paper on your face?
You can, but it won’t have the same results. While the glue is good for your skin, the paper is needed to create the tension to keep the muscles flat.
Okay ladies, I made the glue and I know a few of you have been having a hard time with it. What I did was I made a double batch of the glue, that seemed to work. I put it on medium high heat first, turned it down to a little under medium heat and put in the powder and then stirred it periodically throughout the 15 minutes and it worked great. It doesn’t make very much. Then I cut out the pieces that I wanted with the natural butcher paper. I cut them like Frownies,so into little squares and triangles.Then I put the glue in a clean jar and let it sit for just a couple of minutes and then took a paintbrush and painted it on to all the little pieces and let it dry. OMG it works great!! They are just like the Frownies. Once they are all dry, I put them in a ziplock to store. Just like the Frownies, I use my rose water to mist the back and put them on… I CAN THANK YOU ENOUGH FOR THE IDEA.. You are the best.. This is going to save so many women and possibly men so much money😀
Thanks for your explanation!
I’ve got a big tip for the glue. In the Netherlands and many other countries in Europe they are obliged to write down the ingredients of the product.
It says:
“ Ongebleekt papier
Kleefstof op basis van dextrine (vervaardigd uit de fermentatie van gerst)”
That translates to:
“ Unbleached paper
Dextrin-based adhesive (made from the fermentation of barley)”
I think the glue is called maltodextrine based on barley. It is used a lot in the food industry. But please do also your own research on this subject. and make sure you use a version that is also food grade. Just like your paper 🙂
Source: https://www.frownies.care/frownies-producten-bijsluiter
I make it like this and it works very well:
Dextrin-based adhesive is relatively easy to produce, since dextrin is a water-soluble polysaccharide obtained from starch. Here is a simple guide to making dextrin glue:
Ingredients:
Dextrin (can be made from starch, see below)
Water
(Optional) Preservatives (e.g. Vinegar or citric acid to prevent mould growth)
(Optional) Glycerine (for a more elastic consistency)
Production of dextrin from starch (optional):
If you don’t have ready-made dextrin, you can make it from cornstarch or potato starch:
Sprinkle starch in a thin layer on a baking sheet.
Heat in the oven at 200 °C and stir every 15 minutes.
The starch turns light yellow after about 1 hour – that’s dextrin.
Production of the glue:
Heat water:
Heat about 200 ml of water in a saucepan or bowl.
Stir in dextrin:
Slowly add dextrin to the hot water (e.g. 50-100 g) and stir constantly so that no lumps form.
Adjust consistency:
If the glue is too thick, add a little more water. If it is too thin, add more dextrin.
Optional: Add preservatives:
Add a few drops of vinegar or citric acid to extend the shelf life.
I use brown package paper, spread the glue on und let it dry. Then I cut it into squares and triangles, put it into a plastik container and it’s ready to use.
OMG Geka, this is so helpful and genius too! I am so going to do this!
Awesome. Gonna try this.
thats incredible thank you so much for the information! ☺️
Hi all! I have a few questions. You guys seem like you know a thing or two. Sooooo….Can I make the glue and apply it to a bunch of patches? Meaning can I do it one time and keep them in an airtight container for easy access and use or do I have to apply every day to new patches? Having a jar of patches on my vanity would be so much easier than having to go through a whole cooking process every night.
Yes you can, I just made some to see if it would work. I made a double batch of the glue and right after I took it off the stove I let it sit for just a few minutes and then I took a soft bristled paintbrush and painted it on. I let them dry and it works great. I stored mine in a Ziploc bag. I also added a little frankincense oil to the glue while it was cooking.
Did you cut the paper before or after applying the glue? It seems it would be easier to apply glue then cut?
Goooood idea! The glue is so cheap. I’m going to do this, then make stencils I can reuse quickly. Maybe stack a few sheets to cut a bunch at once.
Thank you so much for showing us how to make frownies using safe products. I had been wanting to do this for a while but was hesitant to use the products posted on other sites. I am loving that this method is so easy and cost effective! You are the best!😊
You are so welcome! I love hearing that the info was useful!! 🙂
I am SO glad I found this article. Frownies were costing me about $30/month and I was having a hard time justifying the cost when the product likely costs pennies to make. While the do work well most of the time, I couldn’t help but feel I was being ripped off.
Your DIY solution honestly works better and costs a FRACTION of the price. I am SO HAPPY and telling all the women I know.
Thank you!!!
I love hearing this!! That’s exactly why I wrote the post. Once I discovered that there was a cheaper and healthier way to make your own version, I had to share it with others.
So grateful for this post! I have become addicted to frownies because they do really help, but they are so expensive and I need to recover from some big bills. Just ordered my supplies. I’ll let you know how it goes! I may keep the frownies that I have left for traveling.
Very happy to hear this! Frownies are great, but so is saving money. 😉
I just did your recipe and I truly think these are better than frownies 😂 I did a double layer on my forehead – they are sooo stiff and sticky. Frownies didn’t stick to my skin super well unless it was DRY. I like to put tallow on after I wash my face. Tonight I applied my normal tallow, then blotted it with a towel and used your DIY. So far, so stiff! We will see how the night goes.
Awesome! I’m thrilled to hear that these are working so well with your specific beauty routine. You must have done a great job making your glue.
tallow? like beef tallow? I need to look into this
Yes! Tallow has completely changed my skin. Just a little bit of VERY high quality tallow and a quick dry-brushing and my skin is clear of acne, even toned, more elastic with fewer wrinkles.
Mind sharing the source for your tallow?
I made my glue yesterday, but I’m using it now and am wondering do I need to wait? Once I’ve put glue on the patch can I put it on straight away? I tried and it kind to fell off only a little bit stick but then it may have been I was over laying them and didn’t wait for it to down down
Yup, it takes a little bit of time for the glue to fully set. Your drying time will depend on the thickness of your glue. I typically apply the glue to the paper and then push on it with the palm of my hand for about a minute.
Just curious how you use this when you travel, say on an airplane, and won’t have access to a fridge? Do you just go a week without using them?
If I bring the glue when I travel, I just stick it in a fridge when I arrive. You could try adding grapefruit seed oil or ascorbic acid to the mix since both have anti-microbial properties. I haven’t tried this, but it should be an easy addition.
I’m going to make this and try adding a few drops of helichrysum or frankincense essential oil and see how that turns out!
In theory, it should be good for the skin because those oils are antibacterial/anti-inflammatory and I read somewhere that Arabic gum is a good emulsifier for eo’s.
I’d love to hear how it turned out with the addition of the essential oils!
I measured exactly 1/3 cup water, heated it, added 3 tablespoons gum arabic, planned to cook it for approx. 15 minutes. After 5 minutes it was almost gone and a gummed up mess. I didn’t even have enough to use once, plus it was hard and wouldn’t spread on the paper!
What did I do wrong?
Hi, Annie! There are so many variables when making the glue that it does require a bit of trial and error. Off the top of my head, one of the potential issues could be that the saucepan was too big (larger surface area heating the glue faster). Another would be the level of heat. Have you tried it again?
I used too big of a pan as well and had to turn mine off because the edges were burning. I think my temp was too high for the large surface area. However, I salvaged some and it worked wonderfully. Next time I will use a very small pan!
According to Google, Gum Arabic can have health consequences (skin entry)
up to 30g a day is *thought to be safe.
have you done any research on this in med journals etc?
curious because I’d love to make these
The conversion of 30 grams is about 2.4 tablespoons (for us Imperial measurers), and that would require using a lot of glue. That’s an amount one might use over a few weeks.
Regarding the skin safety of gum arabic, it is actually used to to make hydrogels to heal wounds and lesions. Check out my other article with the links to the medical studies:
https://upkeepist.com/the-unbelievable-health-benefits-of-gum-arabic/#skin-health
Hope this helps!
Thank you so much for taking the time to share this.
Would this recipe work if I spread it on the paper and let it fry, later waiting it to use as the frownies?
To me this I’d super convenient.
You’re welcome! I haven’t tried that technique since I’m already in the habit of just applying the glue whenever I’m going to use the patches. I’m not sure how the glue would hold up since it doesn’t contain any preservatives.
I’m actually going to try this very soon. I’ve made this glue a few times and it really is perfect, and feels much better than Frownies. But the second and third times my little jar grew mold, and yes I was as clean as possible every time I opened that lid. And the jar was sterile.
I’m going to try to make it thin enough to brush on large strips of paper, letting it dry, then cutting them into smaller strips. I’ll report back!
Here I am, reporting back! Looks like others here have tried this as well. I FINALLY made premade Frownies and they’re absolutely perfect.
I cut a large piece of brown butcher paper and painted the glue all over it. Then cut it into strips while still wet and put all the strips out to dry. A single batch of glue made a ton of frownies…I would guess maybe 75-100 sizeable rectangles? They fill a sandwich bag. I use 3-4 rectangles on my forehead every night, and simply spray a fine mist of water and apply!
You know what else I love? It seems to be great for my skin. I have a ton of issues with stress breakouts on my forehead and this helps. Maybe it’s just keeping it clean while I sleep lol
I love seeing this! When I originally typed up this article, I had no idea it would build a community of people helping each other like this. It’s heartwarming.
I’m wanting to pre-make mine as well. Did you have to store them in the fridge after making them? How long did you your batch stay good? I’m thinking of making a few months’ worth at a time. I currently use about a box of Frownies a month.
Where do you find butcher paper? I have used kraft paper and the sketch pad paper and both do not work. They left outline of the “frownie” on my forehead.
I bought Acacia powder and tried your recipe. Unfortunately, it never really got to a glue-like consistency. It remained very watery. I kept the heat on medium/medium-high, making sure it didn’t come to a boil, and kept it on the stove for 15 minutes, stirring frequently. I’m not exactly sure what I did wrong. It looked like brown water. I’m putting it into the fridge to see if it gets a little thicker. Any tips?
Hi, Monica! There are a lot of variables when making these, but I’ve found (through lots of trial and error) that either adding more powder or cooking longer will eventually result in the desired consistency. Have you tried it again since you wrote this?
It took me over a year to try again but since I had all the ingredients already, why not give it another attempt? I have no idea what I did differently this time but it worked so much better. I also read all the comments since my first post and glued (painted the glue on) a big sheet of the craft paper and let it dry for a few hours. Then I cut the sheet into small squares/triangles. Tonight I put a very small amount of water on them and tried them on dry skin and they worked great! Tomorrow night I hope to test them on my skin after my typical nighttime routine of castor/jojoba oil. Thanks for encouraging me to try again and thank you for posting this in the first place! The craft paper and Acacia powder I bought will last me a LONG TIME so if I keep making my own Frownies with your recipe, it will save me HUNDREDS of dollars! 🫶🏼🥰 THANK YOU!!
Monica, I’m thrilled to hear that you gave the recipe another shot! The more often you make the recipe, the easier it becomes. You’ll get a feel for how to modify the glue and the application process to fit your personal tastes. This comment section is a wealth of knowledge. I’m so happy everyone is willing to share their personal experiences so we can all learn from each other. Thank you for keeping me updated and for sharing your tips. Let us know how it goes with the oil base!
Hi thank you for this!
Question, do you make a bunch of these at one time, allow the glue to dry, store them and then when ready to use you wet them to re-activate the glue? Thanks
Hey, Hannah! You’re so welcome. I’m glad you found the post helpful. I keep the glue in the fridge and just apply it to the butcher paper every time I use them. It’s fast and easy, and keeps the glue from going bad since there are no preservatives added to the mix. Just make sure you’re using a clean finger or brush to apply the glue. Let me know if you have other questions!
Hi Rubina,
I am using Frownies on my forehead, but am not convinced that one needs to use multiple patches to create a “cast” on the forehead. Frownies used to make a singular patch for the forehead, but no longer, as they state that multiple patches are more effective.
In your picture it appears you have one patch on your forehead. What is your experience using one patch, as opposed to multiple? Your response is appreciated 🙂
Hi, Kim! You’re correct, I use a single patch on my forehead. I think the strength of the glue is the most vital component here. When making your own glue, you can adjust the viscosity. Personally, I don’t see the benefit of using multiple patches. But I could be wrong! I’d be interested to hear from anyone who tested this theory.
Thanks for your response, Rubina! I got my supplies and going to give it a go!
I feel like the paper is to thin?..anyone else think so?
The reason I like the thinner butcher paper is because it doesn’t holds well without causing deep creases on the skin. Formerly I used sketch book paper which is a bit more heavy duty. You can try that to see if it works better for you.
I agree! I feel that the paper is too thin.
Haven’t used them yet, but I boiled the glue and used a small roller to apply it on a 12×6 piece of the craft paper (I felt like it was too before I even took it out of the package)
The paper immediately wrinkled and curled on the ends.
I was hoping to cut large batches using my cutting machine, but I’m not sure this particular paper is going to work.
I remember reading that the reasoning for multiple, smaller patches is to conform to the shape of your head, because one single larger patch wouldn’t lay as flat. Just throwing that out there 🙂
Yup! When the Frownies people talk about it, the explanation is that the smaller sections act more like a cast.
Hi! Thank you for sharing all this info. Excited to try. I sleep about 6-7 hours a night, is this long enough? Also, how often should we wear them?
Thank you!
Hi, Vickie! Any amount of time that you’re wearing them is helpful. That’s 6-7 hours that your smoothing lines. I know many people wear Frownies every night, and consistency is certainly key to good results. I take a break every couple days under the pretense that I’m letting my skin breath overnight. But mostly I’m just being lazy about it. 😉
I think giving yourself a break from the patches prevents the muscles from getting used to them, just like switching out skin care products prevents the skin from getting used to the same products. That’s just my opinion.
Hi thank you so much for this!! The strips are so expensive and they don’t last nearly as long as they say they do!
Do you reuse these or it’s a one time use? And I feel a bit silly asking this but I don’t understand how to apply it to the face? Do you stick the glue to the strips or you put the glue on the face and then stick the strip to the glued part of your face?
You’re welcome, Danielle! It’s one-time use. But that huge roll of butcher paper only costs like $15 bucks and lasts for a really, really long time. It’s not a silly question. (I need to quit slacking and just make an instructional video already.) I cut the paper to the shape I want and with a VERY clean finger rub the glue on the paper. Then I put the paper on my face. You could, alternatively, put the glue on your face and then stick the paper on. But I find it’s easier to control the application by putting it on the paper first. Hope that helps!
So glad you posted this, I’m allergic to frownies so I’m really glad to have found an alternative
Thanks
Oh wow, I didn’t know that any of the ingredients in Frownies could trigger allergic reactions. But I’m very happy that these instructions could help you out.
I noticed my frownies smell a bit like honey. Is that what the gum Arabic smells like?
Also, probably a dumb question, but the gum Arabic powder I have on hand from an art supply store would not work for this purpose, would it?
Brooke, if you’re asking about actual Frownies that is because one of their ingredients is derived from sugar cane. I believe their glue consists of Nulomoline (derived from sugar cane), Methyl salicylate, and Dextrin. But natural gum arabic glue also has a slightly sweet smell.
That’s not a dumb question at all. It’s best to be safe when you’re sticking things on your face. I can’t say for sure without seeing the bag, but if it’s pure gum arabic it should be fine to use. I’d still verify if it is a food-safe version.
On the Dutch site (where they are obliged to mention the ingredients) they do mention dextrin, but they also mention it is based off fermented barley 🙂
Hi! I’m going to try this. I have tried frownies and noticed that their Kraft paper is a bit thicker than regular paper. Did you find the roll that you got a big thicker then printing paper or about the same?
Thanks
Julie
Hi, Julie! The kraft paper is about the same thickness as printer paper but slightly thinner than Frownie paper.
Thanks Rubina! I made this tonight. I used different Kraft paper as I’m in Canada and found something else but similar to yours. I like it!
You’re very welcome! I’m pleased that you found the post useful.
I have been using this method as soon as my supplies came after seeing your post. I cover most of my forehead and between the eyes. How do you keep the edges of the paper from curling into your skin and leaving a mark? Mine create a new line where the edge of the paper ends.
Hi, Carol! There are a couple things that can help with this:
1. Bend the edges of the paper outward before adding the glue.
2. Don’t spread the glue all the way to the edges.
3. Make a thinner glue.
The viscosity of the glue has a big effect on the how much the paper will crease the skin. You can make a thinner glue by using a bit more water or by cooking it for a shorter amount of time.
I hope this helps! Let me know if you have any other questions.
Hell Yeah!!
I’m going to make a bunch of these for Christmas gifts. Ballin on a budget never looked this good. Thank you so much for sharing this!
Haha! I love the enthusiasm, Jessica. These will make great homemade gifts. And if they like them, then they can easily make their own for super cheap going forward.
I had my doubts, but this exceeded my expectations. I thought I’d be settling for something inferior, but was delighted to find this is actually stronger and more effective than Frownies. Plus, so easy to make and of course a fraction of the price. Thank you SO much for posting!!
You’re very welcome, Leah! I’m really happy to hear that they worked so well for you. My favorite thing about these is that the glue’s consistency can be adjusted to be a lot more effective. The thicker you make it, the better it holds.
Thank you for this DIY! I have one on as I type this! I was having to spending the money on frownies but liked the results I have with them. i believe these will work just as well, If not better since I can make all my own shapes for my own face. The glue is nice and sticky and I hope my face doesn’t react to it
You’re very welcome! I’m happy you found this post helpful. I have sensitive skin and have never had any issues with gum arabic glue.
I would love to hear an update after you use them for a while.
Do you apply the glue to the pre-cut pieces ahead of time, and then wet them before use, or do you apply glue each time you use patches?
I apply the glue each time I use them. I’m sure you could pre-apply it and then wet the patches (like how Frownies work), but for me it’s just easier to do it when I’m going to use them. Let me know how it goes if you try the the other technique.
Hey there! Do you use Twitter? I’d like to follow you if that would be okay. I’m definitely enjoying your blog and look forward to new posts.
I can’t figure out how to leave my own comment so I’m replying here. I have one question — do you need to apply the glue just before using each diy frownie every night? Or can you put the glue on in advance to prep multiple diy frownies? Regular frownies have the glue already on them and you wet it to activate, so I’m wondering if that’s possible with this version. Thanks!!
Love that quote. Thanks for the nice sentiments!
So, I made these using gum arabic powder and using brown craft paper. The issue is that when they dry on my face the edges curl up into my skin and leave lines. I then tried perforating the paper (a LOT) and tried that but got same result. Any tips on preventing this?
That could be due to the viscosity of your glue. The thicker the glue, the more likely it is to leave indentations because it makes the paper really rigid. You can try cooking the glue for a shorter period of time or adding more water which will make the glue more fluid.
Also, if you’re using rolled paper, the ends want to curl in. You can put the glue on the side that curls away from your face, and that can help reduce the morning lines. Let me know if these suggestions help or if you have any other questions. Thanks for reading my post!
I was curious if you ever thought of changing the layout of your website? Its very well written; I love what youve got to say. But maybe you could a little more in the way of content so people could connect with it better. Youve got an awful lot of text for only having one or 2 images. Maybe you could space it out better?
Thanks for the feedback! You’re right, it’s pretty wordy. I’ll eventually be adding video tutorials and more images.
Are we supposed to leave these on overnight like frownies.
Yes, like Frownies, these face patches are most effective when worn overnight.
Thanks! I started using Frownies two months ago but because I need them for my whole forehead I’m going through a box about every 3-4 weeks! In Canada they’re $36 a box so
I’m looking for a way to do it myself.
Can you add a photo or video
If the different cuts you use and where?
Thanks again:)
Great post and straight to the point. I am not sure if this is in fact the best place to ask but do you guys have any ideea where to employ some professional writers? Thanks 🙂
Thank you! I appreciate the kind words. I don’t employ professional writers, but you can find people on websites like Freelancer and Fiverr.
I’ve been using Frownies and thought there must be a way to make these myself. And voila! Your post is perfect. Thanks a million! Off to order Arabic glue and butcher paper.
Thank you so much for the kind words! Making your own Frownies is way cheaper and just as effective. Let me know how it goes.
I am as a result grateful for your post.
Thank you for your kind comment!
I already have a ton of xantham gum sitting in my pantry. Do you think that could be used in place of Arabic gum powder? Thanks for sharing!!
I don’t think xantham gum would work, unfortunately. It has thickening capabilities but isn’t a good adhesive. But testing things out is fun! Let me know if you try it.